General Sharpening Procedures (KE-500, KE280 & KE3000)
All knives except exotic Japanese knives, Sashimi knives and very thin and serrated knives
Sharpening steps shown on the top cover of the machine show a progressive reduction in downward pressure.
i.e. This is firm downward pressure of approximately 1.5 kg (about 3-4 lbs.) with the knife tilted sideways 15º from the vertical, to form a smooth shoulder.
Approximately 0.6 kg (about 1.5 lbs.) of pressure but with the knife vertical (held against the check plates).
Approximately 0.03 kg (about 2 oz.) of extremely light pressure produces the ultimate edge sharpness.
If you are not satisfied with the results of your sharpening, you can repeat steps 1, 2 & 3. This may be necessary when your sharpening belts are getting worn and it may take longer but they usually give superior results.
How to test the pressure you are using:
Stand the machine on an accurate set of bathroom scales and ask a friend to read the pressure whilst you are sharpening a knife. You will quickly learn to use the correct pressures.
Even if the abrasive rolls feel worn, they will continue to sharpen even it if takes longer. The level of final sharpness even improves as the rolls wear! If the rolls split or tear through misuse, replace immediately. When the abrasive on the front edge of the rolls have worn out, you can reverse the rolls to use all the width.
General Information (Nirey KE-280 Sharpener)
The Nirey KE-280 has an extremely powerful (3000gcm) electric motor driving two sharpening carrier wheels, which have a patented cushion contact system. The wheels may be fitted with a choice of fine, medium or coarse grit abrasive rolls. For the ultimate sharpness, (invariably better than when the knife was bought new), we recommend and supply as original equipment, the fine abrasive. If you regularly sharpen heavy cleavers, you may wish to change to medium or coarse grits. In which case, we recommend you order these complete with carrier wheels for quick change over.
To change from one abrasive grit to another when the rolls are already fitted to the carrier wheels, simply undo the wing screw on the underside of the machine, lift off the top cover and unscrew the carrier wheel end plates. The carrier wheels will slide out and then slide the replacement on. Reverse the procedure to reassemble. The whole process should take less than 1 minute.
Sharpening stages commence with the knife in the forward position, lowered vertically into the sharpening slot – with the knife angled down about 20Sharpening stages commence with the knife in the forward position, lowered vertically into the sharpening slot – with the knife angled down about 20º
If you enter the sharpening slot whilst the knife is still traveling forward, you may cut the abrasive belt – in which case this must be replaced before continuing.
If the edge of the knife touches the plastic at the front of the sharpening slot, your hand is too high. Some ‘French style’ knives have pronounced heels after the blade-before the handle, these will not enter the sharpening slots so you will not be able to sharpen the last 2cms approx. of the knife blade.
Knives must be clean and dry before sharpening.
The left sharpening wheel sharpens the left blade edge and the right wheel, the right edge. It is important that these are used alternately (except for Global knives – see special sharpening procedures for Global knives).
On a KE-198: Alternating left then right, pull your knife through the No:1 slot 6 to 8 times then repeat on the No:2 slot. Watch the instructional video – HERE.
On a KE-3000, KE-280, Ke-500: As per the instructions on the cover and in the manual, alternate left then right 4 t0 6 times with a firm pressure then repeat, 4 to 6 times with a light pressure, followed by 2 to 4 times with feather light pressure. Watch instructional video – HERE.
When you have the correct action you will stop cutting belts. Run the heel of the knife down the central guide then pull the knife back to you in a slow steady motion, keeping the knife parallel to the work surface.
Or you have not placed the machine correctly relative to your body position. The sharpening grooves should line up with the hand holding the knife – not the centre of your body i.e. right handed operators – the machine will be positioned about 8” to the right of your body centre line. Left handed operators* 8” to the left.
* Left handed operators will not be able to use the holding handle. They will need to hold the body of the machine on the right hand side.
Models that have changeable belts include:- KE-3000, KE-280 and the KE-500.
3 Ways to change belts:
- Use a can. What this video – CLICK HERE
- Cut the edge with scissors and peel off. What this Video – CLICK HERE
- Using even pressure massage the belt from the wheel. This is time consuming.
Special Sharpening Procedures (KE280 & KE3000)
For when the knife appears to be sharper on one side more than the other.
The standard instructions given are for standard knives, chefs and butchers knives. Below are a few examples of how to modify your sharpening steps for non-standard knives.
Exotic Japanese Knives – Check to see if the cutting edge is evenly bevelled. If it is, then use the standard instructions, however, best results will be obtained from part worn fine abrasive belts. If the knife is bevelled on one side only, e.g. Sashimi knives, then sharpen only the bevelled edge but with the last step. Sharpen the flat side with extremely light pressure to remove any burr.
Serrated Knives – These can be treated as Sashimi knives, sharpening the serrated side only but finishing with a light pass on the flat side to remove burr.
Thin Knives – We recommend you use only steps 2 and 3.
For the ultimate sharpness, finish the knives off with Super fine belts CLICK HERE OR worn fine abrasive belts. If you have purchased spare carrier wheels, the changeover takes seconds and the worn belts will produce a mirror finish to the cutting edge.
A shoulder will form every time you sharpen the knife and it is not a desirable feature – increasing cutting resistance. This is why, in the instructions, we recommend removing the shoulder every 5 sharpening’s by making the initial passes with the knife cantered over slightly (not using the centre fence as in the remaining passes) this means the abrasive is contacting 3-4 mm upwards from the cutting edge, removing the shoulder.
The only way to sharpen a serrated edge knife correctly is on a serration machine. These machines are at any quality Knife Sharpening Shop.
Asian Knives are typically 15 to 17 degrees either side of the centre, making them 30 to 34 degrees over all.
European Knives are typically 20 to 22 degrees either side of centre, making them 40 to 44 degrees over all.
Read more in our newsletter “THE GRIND.”

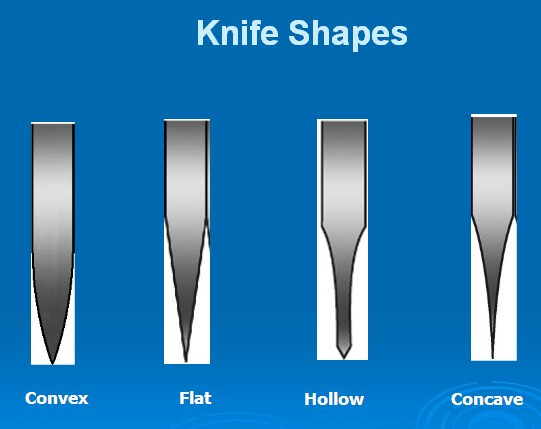
See the image above that shows the difference between common profiles.


